Thursday, October 14, 2010

5 o'clock

I remember watching the reruns of "Leave It To Beaver", "Bewitched", and "The Brady Bunch" when I was growing up.  Common thread? The moms never looked flustered when it came to getting dinner on the table.  I know you remember too.  June, Samantha, and Carol were dressed to the nines, hair coiffed, jewelry on.  The kids come running in, clean, clothes neat and sit down at a perfectly presented meal.  Aahhh....looked idyllic. I want my dinnertime to be like that.

Then reality rears its head and there you find yourself.  Or rather, there I find myself.  

The 5 o'clock witching hour has come and my kiddos are h-u-n-g-r-y.  If I'm good, I will have put something in my handy-dandy crock pot and voila! Dinner is served and I rock as a mom.  Usually it is so NOT happening. I'll get distracted by whatever---my attention span is that of a gnat--and dinnertime will sneak up on me.  And in my head I act surprised that there even is a dinner time.

Don't scoff.  I know that more than one of you has looked at the clock, surprised that it is that time again.

Those surprises are the times I wish I could cook like my mom or grandmother.  They can go to the pantry, find a few things and put a really good dinner on the table in about 30 minutes.  No, they're not Rachel Ray.  They're better.  They have those standby recipes in their heads and can make changes on the fly when they are out of an ingredient.

My grandmother could make biscuits for my granddaddy and herself from scratch.  She'd make 4 biscuits each morning.  From scratch.  And her measurements included sayings like "a little bit" and "put them in a hot oven".  I still love her red-eye gravy (For non-southerners, it's coffee added to the pan that you've cooked sausage in.  The coffee kind of deglazes the pan and you end up with a brown, sausage-y/coffee gravy.  Yummy on biscuits) and no one ever learned to make her fried apple pies.

I'm so Type A that I have to follow a recipe.  DO NOT DEVIATE FROM THE INSTRUCTIONS.  This is the mantra that goes off in my head when I'm cooking.   I'll be the one who sends my kids to the store to get (insert missing ingredient here) if I find I'm out of it in the middle of a recipe.  They've gotten used to it.   It happens more often than not at my house.

But the reason for this post is to share with you all the one recipe I have that requires no measuring and can be made for any number of people.  It is liked by all ages and has been the requested birthday dinner of The Younger Daughter for years.  It can be put together in a snap and the kids can help.  Heck, they can pretty much do the whole thing and you can go and watch your TiVo'ed episode of  Live with Regis and Kelly.  See how great this recipe already is?

And here it is.  Baked Parmesan Chicken.

You'll need a stick of butter, Italian seasoned breadcrumbs OR plain breadcrumbs and some Italian Seasoning, garlic salt, pepper, freshly grated Parmesan cheese and boneless chicken tenderloins or breasts.

You'll need a hot oven. (Hi Grandmother!) As in 350 degrees.  While it is preheating, get a large pan.  I'm making enough to feed my family of 5 plus extras for lunch tomorrow, so I'm using a 9x13" pan.  Put one stick of butter in the pan and let it melt in the preheating oven. (See how we're multi-tasking? We are so good!)


While the butter is melting, get the chicken chopped into bite sized pieces.


Pour the breadcrumbs into a pie plate.  I find that the raised edges help keep the breadcrumbs from making a huge mess.  **Note: If you have plain breadcrumbs, just add some Italian seasoning to the breadcrumbs and mix around.  I just used what I had in the pantry.**  Add the Italian seasoning, garlic salt and pepper to the breadcrumbs.

I had plain breadcrumbs. I'm adding a scant handfull of seasoning.

Grate some Parmesan cheese and mix into the breadcrumbs.  I love that microplane. Makes me feel like I'm Ina Garten, the Barefoot Contessa.  She rocks. But anyway.....


By now the butter is melted and it's time to make our assembly line.  Chicken, butter, breadcrumbs, new baking dish.


Coat the chicken in the butter using tongs. Raw chicken is gross enough. Let's not touch it too much, huh?  There's my helpful hint for the day.  Next coat them in breadcrumbs and put in the baking dish.  See? How easy is that? And like I said, the kids can totally do this meal.


Bake at 350 for 25-30 minutes.

If you're feeling special, put them on a stick.  Anything on a stick is extra special.  I wasn't feeling special, so here's what they look like out of the oven.  Yummy!! (excuse the extra brown part...the breading got a little too brown.  There was no chicken there. The rest of the chicken should be the golden color.)


So to recap- home-cooked dinner that the kids made, minimal dishes, and bonus- I got to watch my Regis and Kelly while folding laundry.

Multi-tasking makes me feel like a rock star.

Tuesday, October 12, 2010

I'm NOT Martha

In case there was any doubt, I'm not Martha Stewart.

I don't have people to pre-cut the veggies for my soup.

No one is around to make sure the circle of cute paper is perfectly cut.  I do it old school, baby.  I freehand.   Aww yeah. That's how we roll here.

I'm going to share with you my adventures in trying to make a pumpkin topiary.

Google that term.  You'll get lots of responses.  Most with pictures.  They are all so pretty.  So fall.  So Southern Living.  And most, if not all, say how easy they are to make.  Easy.  That is my craft level.

I know you all are riding high on my last craft post with the modge podged pumpkins.  I must admit that those were cute.  I figured I was on a roll, so lets branch out to my front step.  My very best friend got me started thinking when she texted me the picture of her front entry...freshly painted front door, pumpkins in the urns resting delicately in a bed of fall leaves, white pumpkins placed strategically for maximum impact and a fall-themed wreath on the wall near the door.  It really looked nice.  My front entry?  Not so much.

Imagine dead stick-like plants in black-ish urns, aqua globes sticking out dry as a bone.  Pitiful. So pitiful I was embarassed to take a picture. (no, not really. i just forgot to take a "before" picture of my front step before my daughter had thrown the dead plants away.)  I told my friend that I was going for creepy instead of homey and welcoming.

So welcome to my attempt at topiarys.  I'm showing you the dirty truth.  Right now I'm in the middle of this project and I invite you to laugh with me as my topiaries look like pumpkin people without faces since I forgot to get the small pumpkin for the top.  I'll have to fix that today.  So again, go ahead and laugh at my first attempt.  Goodness knows I am.

Maybe this should be the how NOT to make a pumpkin topiary.  It can be a cautionary tale.   I am a giver, you know.

You'll need 3 pumpkins per topiary- large, medium and small, a hot glue gun, 2 dowels and some leaves.
I was trying to be organized, but got ahead of myself...welcome to my crafting world. Notice the drawer open, the other random stuff....this is how I craft.  Not a pretty process.

I had read somewhere that for the bottom pumpkin, using it upside down was easier, so I tried that. I cut off the stem, drilled a hole through the pumpkin and skewered it on the dowel. The dowel is the stake to keep it in the pot as well as the stacking mechanisim.


So now i've added the medium pumpkin on the stick.  You can see the stick is NOT sticking out the top of the second pumpkin.  This is because I didn't have the smallest pumpkin yet--I was planning on making a 2 pumpkin topiary here.  I've also started gluing the leaves on.  I just had a garland of leaves and took them off and glued them on one at a time.  Sorry for the awkwardness of this picture. I was holding my pumpkin-on-a-stick and trying to do the picture.  For next time, maybe I'll work on the pumpkins while they are in the urn.


So here is the finished product- sort of.  They weren't tall enough for me and they really didn't look finished.  (See the AquaGlobes? I really have them.  I really used them.  Except they don't work unless you actually put water IN them. Go figure.)  At this point I went ahead and cut the stem off the middle pumpkin and shoved the dowel up through that one as well.  This would give my small pumpkin something to sit on.

I have to make a quick run to Michael's.  Talk amongst yourselves while I get those last pumpkins.


So here it is with the small pumpkin on top.  They aren't too terrible.  My kids thought they looked like orange snowmen.  Not exactly the look I was going for, but I'll take what I can get.  I need to get better at the decorative leaf placement.  They don't teach that in Home Ec.


My front door! The ghost is not homemade. It was a gift from my mom.  I can tell you it is just a hanger stretched out and bent to make the arms, the hanger is where the head is and it has stuffing around it, tied at the neck.  The hat is black burlap and the white is something like cheesecloth.
But check out the topiaries! Not too Halloween-y and I can leave them out till after Thanksgiving! My pilgrim people will look quite festive next to them.  I love double-duty decorations.

Happy Tuesday, Ya'll.  

Friday, October 8, 2010

Computer Not-So-Savy

Confession time. I know little to nothing about computers. I can email and download pictures with the best of them. I just learned the magic of "link" and must say that I was patting myself on the back when I figured that one out.  Now I link to EVERYTHING! In fact, at the end of this post you'll benefit from my linking ability.  

You can thank me later. 

Even with all those amazing skills, I have huge problems with anything electronic. 

My iPhone will spontaneously turn off or kick me out of an app with no notice.  

The BlueRay dvd player we have must have a grudge against me since every time I try to play a movie, it shows a "cannot read" message in the dvd window.  Do you think it  has a problem with the movies I pick?  Maybe it doesn't like Pirates of the Caribbean?

The computer I'm using to do this blog will have moments, days even, where it won't log onto the Internet.  Do you think it is trying to tell me to stop surfing?

Even my car gets in on the action.  The liftgate for the trunk has a button to push to open it. Hello lazy housewife trunk button.  When I'm in the car, the trunk won't open.  It makes noise but won't open no matter how much I talk to it, push the button or, in times of stress, yell at the trunk. 

Now, enter my husband, stage right.

All he has to do is walk into the room and the electronic space-time continuum is once again aligned. The clouds part. The sun shines down upon my countenance and, I promise you, birds start singing. 

And my electronic devices magically work. 

When he's away on a trip, it puts a kink in the web-surfing-phone-calling-emailing part of my day.  He calls it my bad juju.  

So if you're in my area, keep the electronic devices at a safe distance. I'd hate for my electromagnetic field to mess up your stuff. 

But for today, things are working well.  (He's been home for a while, so he chalks it up to his mere presence in the house.) In honor of my electronic devices working as they should, I'm going to share some links to some super cute sites...Be amazed at my linking ability. I'm sitting here patting myself on the back as I type. 


Little Household is the precious blog of a friend named Jennifer.  She and I are from the same town and her blog showcases her wonderful designs, unique finds and her adorable kids.

from Little Household- photo by Jennifer


The Crafting Chicks is a great site to see some super cute and creative stuff.  Free downloads for Halloween now.   The downloads make me want to bake something....


I Suwanee is a design site.  I like it because it reminds me of my grandmother. She said "I Suwanee" all the time. And I love that chair...and the red door....

from I Suwanee

Happy Friday, ya'll.  Hope your weekend is filled with beautiful fall days, crisp nights and no electronic devices. 

**I noticed the font changed...sorry about that. my juju is playing tricks with my computer again.**


Wednesday, October 6, 2010

Craft!

**DISCLAIMER...I saw this craft somewhere out in blogland and can't remember the site...so please know that I'm NOT the creator of this idea.  I'm just someone who saw something and went home and copied it. **

The nights are cool here and the days are awesome! It makes me think of all things fall- especially pumpkins!

I'm not a Halloween fan, so anything pumpkin had better do double-duty at my house.  That means it should be appropriate for Halloween right through Thanksgiving.  The less rearranging of things for me, the better.  So here's a craft we started last night at 6pm.  It only took us about a hour from start to finish and the results are adorable!  My son participated for a grand total of 3 minutes, but he was a great cheerleader for the other 57 minutes of the project.  So get your table covered, get your kids,  get the stuff and get started!


You'll need Modge Podge, a fake pumpkin (mine are from Michael's...they were 50% off!), sponge brushes and fall or Halloween scrapbook paper.


From our experience, smaller pieces of paper work better.  Put the Modge Podge on the back of the piece of paper, stick it to the pumpkin and then put more Modge Podge over that piece.  You'll need to use your fingers to smooth everything out.  By the way, we didn't cover the bottom of the pumpkins. We just put the paper as low as was needed to cover the pumpkin when you looked at it. Notice the faucets  next to my daughter.  They've been there for 2 weeks. Someday we'll get those installed. Good of me to get them out of the picture.  Welcome to my real life. Faucets on the kitchen table, mattresses on the landing, laundry everywhere. And we're doing crafts. I have my priorities straight!


Let the pumpkins dry overnight.  I set mine outside on wax paper because the Modge Podge fumes were starting to get a little strong!


To finish them off, I printed out labels from it is what it is. Too cute.  I used my kitchen twine to tie the labels on, but raffia would be cuter.


Finished product! Hope the teachers like them.

Tuesday, October 5, 2010

The Meat

This post is for all of you who love a good meat sandwich.  It appeals to guys, girls and kids alike. It's easy, can be made a few days in advance if you're so inclined and it gets better if it sits overnight.

It's a favorite recipe and I'm going to share it with you. But beware...once you've made this, you'll be asked to bring The Meat on beach trips (it's superb for travel!),  for sports parties (World Series or Superbowl anyone?) and it makes a wonderful make and take meal for those times you're taking dinner to a sick friend.

Here it is.  From my mom's kitchen to my kitchen to yours. Enjoy!

The ingredients...


1 London Broil steak, 1 packet onion soup mix, 1 beef bouillon cube dissolved in 1 c water, 1 packet Au Jus mix, hogie rolls, provolone cheese ( I didn't have beef bouillon, so I used some beef stock...about 1/4 cup)


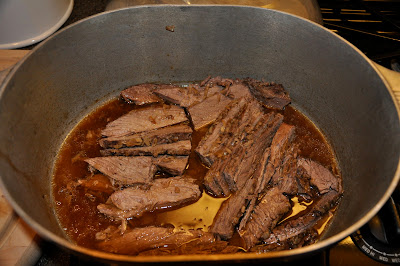
Preheat your oven to 300 degrees and get out a Dutch Oven or other large covered baking dish.  I'm using the Dutch Oven from my grandmother. She was a great cook and this pot always does a great job on this dish.


Brown the steak in the pot you're using. I forgot to do this because I was in a hurry to get the steak in the oven...welcome to Mondays at my house. No problem, though. After its cooked, if you'd like it more brown, just slice it and brown it a bit in a skillet before putting the sandwiches together.


While the steak is browning, dissolve the bouillon cube and soup mix in 1 cup of water.  Pour this over the steak.


Spread out the onion soup stuff so the meat is equally covered.

Put the lid on the dish, pop it in the 300 degree oven and bam! You're done.  Let it cook for 1 1/2 to 2 hours and make your house smell yummy!

About 15 minutes before The Meat comes out of the oven, make the Au Jus.   I'm sure there is a way to do this that is super special, but my mom always used the dried packet you mix with water, so that is what I do. And that is what you do too...empty the packet into a small saucepan, mix with the amount of water listed on the back of the package and heat it through.  Easy!

So now The Meat is done. Your house smells amazing and you're hungry.  Hang on just a minute and here's what you do.


If you want to eat it the same day you make it,  simply take the meat out of the pan, slice it in thin slices and make your sandwich on a hogie roll.  We always slice the meat and put it back in the pan it cooked in so it could soak up more of the beef goodness.


Serve The Meat sandwiches with a bowl of Au Jus for dipping.  I'm sure this sandwich would be good with sauteed onions and peppers, mustard, mayo, or whatever else you can put on a sandwich.  We like it plain and simple at my house, but as they say on American Idol, make it your own.


Oh my goodness.  I'm so happy. Except for my crazy wrinkly hand. Whose hand is that? Ignore the hand.

**If you'd like to make this a day ahead, just cook it, slice it, and put it back in the liquid it cooked in.  Put that pan in the fridge overnight and just reheat the whole thing on the stove the next day.**

**If you're making this to take with you on a trip or whatever, cook The Meat and then after it's had a  chance to cool, we slice it and put the sliced meat and all the liquid in a Ziploc bag.  We double bag it (to prevent spills) and just keep it in the fridge till we're ready to eat.  We usually have it on the second night we're traveling---it's a tradition, so it does keep for 2 days, plus lunch the next day.**

The pictures showed certain brands...I'm not advocating the use of those specific brands, they were just what I bought at the store today. 

Monday, October 4, 2010

Fall in Preschool

Fall where I live is the best time of year.  Not too cold or rainy. Beautiful clear blue skies and colorful leaves.  We're about 1 1/2 hours from the mountains and apple orchards.   The temperatures  are perfect for wearing your favorite jeans and that cute top you've been saving for a day just like those we're having.  I love fall. Can you tell?

My boy is in preschool.  Preschool provides the opportunity for celebrating any and everything--even the change of seasons. It's great! Just about every day is party day in preschool!

Last week was my son's Fall Party.  What exactly IS a fall party, you ask? Well, let me tell you all about it.


First they lined up and headed outside with their bags. We weren't sure what the bags were for, but hey, the teacher said to hold onto the bag, so they did.  My boy is at the end of the line. They must line up by height. 


We made it to the bike trail and the children were told by the teachers to pick up things that reminded them of fall.  My son (not pictured) was picking up sticks.  Not too fall-ish. These other little kiddies were looking for leaves, acorns and such.  


He's showing the 45th acorn he's picked up.  Can't see it, but it is a super small acorn. By this point I'm just glad he's moved past the sticks. 


This sweetie pie is picking up leaves. She didn't like the brown ones and I don't think this one made the cut to go in her bag...she didn't like the brown on it. (Look at her sparkly shoes...aren't they great?)

So we finish the walk and all the parents want a class picture.  Here is what we got....


Herding cats, I tell you. It's amazing that we got them to a spot and in a line. A group. Looking in basically the right direction. Sort of. Well, a majority of them are looking the right direction.  


Ok. Here we go. This is after parents stepping in and physically placing their child in the right position...all while we are jumping around and saying "Look here!" and "Smile!". My son never smiled. He's stoic. 

We head in for special snicky-snack. Rice Krispie treats (made by yours truly...I really went all out) and fruit.  I'm thinking the fruit will be in a bowl and we'd just give each child a few pieces.  Boy, was I wrong.  Look at how the fruit came to the party.....


Excuse my blurry picture. Each child got a cute little brown bowl that had their own individual fruit portions. The strawberries were worthy of a TV show.  It was adorable.  My poor little rectangle treats looked a bit sad next to this display of food staging. 

Next party I'm going to have to step it up a bit.  Our next party is around Thanksgiving. I'm going to start planning now. 


IKEA


The rooms for my girls are still in a state of disrepair. Old beds still sit on the landing since I don't really know what I want to do with them. Toys they no longer want are in bags and the pictures that were once on the walls are now leaning up against them since I don't want to put nail holes in my pretty "new" walls!

One thing I did get done was making a trip to IKEA to get a chair for The Oldest's room.

She's at the age where she hangs out in her room with her friends  a lot and her bed is getting a little small for everyone.  A big, fat, girly chair seemed like just the ticket.

Mom and I headed up there to scope things out on a weekend. Note to self- DO NOT GO TO IKEA ON A WEEKEND IF YOU CAN AVOID IT.  Evidently, weekends are the destination of choice for everyone in my state, along with their cousins, second cousins and third cousins, once removed.  And me and my mom.  Brilliant planning on our part...but I'm wandering....

We found a chair, but didn't think it would fit in the car we came in.  No biggie. I'd come back during the week when the store is blissfully empty.

When I head to IKEA the second time, I'm by myself.  No problem.  At least I tbought it would be no problem until I actually go in the store.

For those who are not IKEA initiated, the store is huge and you pretty much have to meander through the entire store in order to get to the boxed-up furniture section.  This part is right by the checkout lines.  When I walked in, I figured I'd just go back through the checkout lines since my chair was in the isle closest to those lines.  In and out in 15 minutes.

I was wrong.

The IKEA employee of the month told me that I couldn't walk back through an empty checkout line, that I had to go through the entrance and wander on the curving cement pathway through the entire store.
Pleeaassee......

I make it to the spot where the furniture carts are kept. Those things don't roll straight and to roll one by yourself when it is constantly trying to go left is actually more challenging than you might think.

So I'm rolling an off-centered furniture cart through the huge warehouse isles of IKEA, headed straight to my chair not realizing that I haven't thought far enough ahead to know that I'd need some help getting the chair on my cart.

**Pull out the video camera for America's Funniest Home Videos now.**

My chair easily weighs about 40 pounds. Not too much. My 4 year old weighs 53 pounds and I can hold him just fine.  The problem with my analogy is that the chair is 40 pounds of awkward weight. And now I'm trying to move this box with a chair in it onto my crooked-rolling cart that doesn't have brakes. So when I try to just flop the box on the cart, my cart just rolls backward and the box ends up on the floor.

By this point I'm sure the box is weighing 80 pounds and has grown exponentially.

I'm now trying to deadlift this box onto the stupid cart while simultaneously keeping one foot behind a wheel to prevent the cart from moving backward. This only results in the cart rotating on my pivot point of a foot.  Box is still on the floor.

The whole time this is going on there is a man at the other end of the isle who is clearly seeing me struggle and is not offering his help.  He's not a southerner. At least he's not one who was raised right. And by derned, I'm not going to ask THAT guy for help. He's probably laughing at me and I'm plenty strong enough for this box....

I finally push the cart up against the opposite side of the isle and slide the box across the isle. I prop one end on the cart and put my weight into it while sliding the now 120 lb box onto the cart.  This whole thing has taken about 20 minutes and now I'm sweating.  Oh so attractive.

When I wheel my crooked cart to the checkout, it seems that by laying my box flat on my cart I won't fit through the line. Fabulous.   So I step out of line and attempt to get the box on a small side so it will fit through the checkout.  Again, hope someone gets this on film because I'm sure it would win a prize.

By now the box is about 200 lbs.  It had to be.  And through all my struggles no one offered to help.  There were no southerners in the store that day.  That's what I'm telling myself.

Checkout went smoothly (finally) and then I had to find someone to help me put the 300 lb box in my car.  That part went easily enough...push a button and voila! Here is the guy in the vest whose job it is to help put stuff in cars.  Where was that button when I was on isle 27 working up a sweat and fumbling with this monster of a box? I guess the button is only for the outside.  Bummer.

So here's the chair.  It took about 15 minutes to put together. The Oldest loves it, I love it and as soon as we find a pillow or throw, it will not look so white and plain in her room.


It was a lot of work for that chair and now my daughter's room looks about 1000 times nicer than mine.  I need to work on that....and teaching my son that if he sees someone who needs help he should offer to help.  Because that is what true southern gentlemen do.

And if someone wins money for the video, I should get a cut.